The process of protecting the moisture of concrete surface and enhancing the hydration of cement is known as curing. The physical properties of concrete totally depend on the hydration of cement. If curing is not done properly concrete will be failed to acquire its full strength. Improper curing may also lead the concrete to crack.
Purpose Of Curing
i) To Complete the hydration process between cement and water.
ii) To achieve the maximum strength of concrete.
iii) To prevent the concrete structure from cracking.
Methods Of Concrete Curing
1. Shading
By this method, the evaporation of water is locked in the concrete surface. It also protects the surface from heat, wind, etc. In cold climates, it prevents the concrete from freezing by preserving the heat of hydration of cement.
2. Covering The Surface
In this method, the concrete surface is covered with wet gunny bags or waterproof papers to avoid water loss and to protect the concrete from further damage. This method gives satisfactory results for concrete slabs and pavements.
3. Sprinkling Water
In this method, water is sprayed on the concrete with the help of nozzles at proper intervals. This method is not so effective due to the difficulty of keeping the concrete surface be moist all the time.
4. Ponding
Ponding is the most common method that is adopted for curing concrete floors, slabs, pavements, etc. In this method, the concrete surface is first covered with a moist wrapper for 24 hours.
After that, the covers are then removed and a small amount of clay puddles are constructed around all the area. Then water is filled for final curing.
5. Membrane Curing
In this method concrete surface is covered by waterproof membranes or sealing compounds such as bitumen emulsion, wax, rubber latex emulsion, water repellant, plastic films, etc.
The membrane protects the water loss from concrete. It is seen membrane curing for 28 days gives equivalent strength to two weeks of moist curing.
6. Steam Curing
Steam curing is done by increasing the temperature of concrete in wet conditions. This method allows the concrete to achieve its full strength within a short time; thus, curing is also finished within a short time. Steam curing is mostly adopted for the production of precast members.
Minimum Concrete Curing Time
The curing period should be as long as practical. Atmospheric temperature plays an important role in the process of curing as it affects the hydration process which is an exothermic reaction.
Maintaining proper temperature is also essential as it also determines the curing time. For most concrete structures, the curing period at temperatures above 5º C should not be less than 7 days or until 70% of the specified compressive or flexural strength is achieved.
The period could be reduced to a minimum of 3 days if high early strength cement is used and the temperature is above 10ºC. As per IS 456 – 2000, concrete should not be cured less than 7 days for OPC, & 10 days for concrete with mineral admixtures or blended cement.
In case of hot weather and dry temperature conditions, the minimum curing period should be 10 Days for ordinary portland cement and 14 days for concrete with mineral admixtures and blended cement.
The curing time depends on the following factors:
Types of structural members.
Size and Shape of the member.
Type of cement used,
Mixture proportions,
The required strength of concrete.
Grades of concrete.
Atmospheric temperature.
Method of curing.
1. What is the curing period of concrete as per IS code?
FAQ:
Minimum 7 days for OPC and 10 days for concrete with mineral admixtures or blended cement.
2. Why curing of concrete is important?
Curing is very important for concrete to achieve full strength. If curing is not done properly the concrete will be failed to acquire its full strength Which may also lead the concrete to crack.
3. What is the fastest way to cure concrete?
By covering the concrete with plastic tarps. It will lock the moisture escaping from the concrete surface.
4. How long does 4 inches of concrete take to cure?
Minimum 7 days.
I hope you now have enough knowledge about curing and its methods. If you have any questions regarding this, feel free to ask me in the comments. I will try to answer as soon as possible. Thanks.
Home / Construction / Design Criteria Of Septic Tank
Septic Tank:
Septic tank is a tank where sewage is kept a long time for sedimentation of suspended solid by anaerobic microorganism activity.
Septic Tank Design
Basically, the tank is rectangular in shape consisting of rooftop with two chambers, isolated from each other by a baffle wall. The first chamber is called grit chamber in which the sewage enters first and the rest one is called anaerobic chamber.
Inlet and outlet pipe should be fitted in such a manner that while entering or existing there should not be any unsettled influence in the sewage of anaerobic chamber. Sand, grit etc is settled down in the grit chamber before the sewage is directed to the anaerobic chamber. In the anaerobic chamber, natural solids settle at the base of the tank where anaerobic bacteria follows up on it and changes over complex unsteady mixes to more straightforward stable mixes.
Septic Tank Design:
The following measure should be kept in view to design a septic tank:
1. The floor zone of the git chamber must be adequate to decrease the speed of steam and to allow sedimentation.
2. The capacity of a septic tank should be sufficient to give a detainment period fluctuating from 12 hours to 3 days, 24 hours time frame is normally viewed as satisfactory.
3. The depth beneath segment divider opening should be adequate to allow aggregation for the predetermined period. A minimum area of 0.07 m2 for each client in grit chamber and minimum volumetric substance of the grit chamber of 0.02 m3 for every client is required.
4. The minimum width and depth of a septic tank should be 0.75 m and 1 meter underneath water level. The length should be 2 to 4 times of the width. The minimum capacity of a septic tank is granted 1 m3.
5. Every septic tank should be furnished with a ventilating channel minimum diameter of 5 cm.
Home / construction / What Is Floating Column – Its Advantages And Disadvantages
Nowadays, every multi-story building (residential, commercial, industrial, etc.) requires an open ground story for parking space, lobbies, conference halls, banquet halls, etc.
So the ground floor needs to keep free without construction except for columns. Conventional columns which are closely spaced are not preferable on ground floors. To avoid this, discontinuity in columns is required, and here floating column comes into existence.
Contents show
What Is Floating Column?
Floating column is a type of column that is constructed over beams or slabs of any intermediate floors of a structure. These columns are not attached to any footings or pedestals. Floating columns are also known as hanging columns. (Refer to the below image)
How Load Transfers In Floating Columns
The load-transferring mechanism in floating columns is totally different from ordinary columns. In ordinary columns, the load is transferred from the column to the foundation and then to the surrounding subsoil.
But floating columns do not transfer loads directly to the foundation. Instead, they transfer loads to the beam or slab on which they are constructed, and the load acts as a point load.
Advantages Of Floating Columns
1. Floating columns are mainly used to fulfill the architectural requirements of a structure. They are very useful when the lower floor has a large span hall having rooms on its upper floor such as hotel, auditorium, etc.
2. They are useful in the construction of soft storeys.
3. The plan on each floor can be varied.
4. The rooms can be divided and some portions can be raised without raising the whole area.
Disadvantages Of Floating Column
1. The main disadvantage of floating columns is it suffers from an earthquake. Beams supported by these columns may experience a large amount of shear, bending, and torsion. However, this problem can be redeemed but is still not advisable in case of lateral loading.
2. As stated above, it attracts extensive forces.
3. It increases storey displacement in buildings.
4. As the columns do not rest on primary continuous columns, discontinuity happens with the below and above columns which makes them vulnerable.
A room can be transformed into a wonderfully illuminated and well-ventilated space with the right windows. There are several factors to consider before installing new windows, including styles, colors, materials, forms and sizes, and technological improvements.
The right windows can add architectural character, improve energy efficiency, boost house value, and light up your interiors. Replacing your old windows with energy-efficient, double-pane windows can help you save money on your heating and cooling bills while also increasing the value and curb appeal of your home.
Source: livingetc.com
However, with so many styles, materials, and features to choose from, picking the right windows for your home can be difficult. In this article, we’ll discuss how to choose the right windows for your home.
Elements To Consider
There are a few things to consider while selecting window replacements for your home. Consider how windows affect the aesthetic of both the interior and outside of your home, as well as how they can affect your overall level of comfort.
1. Appearance
Selecting windows that complement the architectural design style of your home is the first step in choosing the right windows. Choose a window that will complement the inside and exterior of your home.
Consider a window with a screen that rolls up and out of sight when not in use, or one that is intended to allow more natural light and air to flow through, rather than keeping an insect screen in place all year to maximize light flow into the home.
2. Energy Efficiency
Because windows account for the majority of your home’s temperature variations, always go for energy-efficient windows that can save you money on your energy costs. The design, glass type, glazing, and seals of your window determine its energy efficiency.
Energy-saving elements such as tinted or ‘colored’ glass, Low-E glass, IGUs, and thermal breaks are all worth considering. We should know about U-values, Low-E insulating glass with argon windows, and weather-stripping as they relate to energy efficiency.
The insulating value of windows and other fenestration goods is measured using U-values. The lower the U-value, the greater a window’s ability to keep heat and cold out (the reverse of the R-value, which is the higher the R-value, the better the insulation in the walls and ceilings). In all climates, a low U-value is essential.
3. Installation
The process of installing windows might be simple or complex. If you’re thinking about hiring a professional, it’s a good idea to ask about installation options before you buy your windows.
4. Function
While the primary role of a window is to allow light in, they can also function as a gateway – as in a sliding glass window door providing entrance to a porch, for example – or they might be fixed and ornamental solely for aesthetic reasons.
Consider which rooms your windows will serve and whether a view is necessary or if light into a dark space, such as a closet or pantry, is more important. Before choosing a window style, try it out to see how easy it is to use, like, whether it is easy to open or is it simple to keep clean, etc.
Is the crank handle on a casement window folded away to allow the window styles undisturbed? If the window will be used as an emergency exit in the event of a fire, ensure sure it opens easily and has enough space to meet the requirements of local building rules for emergency escapes.
5. Location
Consider which way your windows will face and how much sunlight or weather they will receive. Oversized windows with conventional glass can let too much hot sun into a home during the summer months, which can be a bad thing.
For more seclusion, look for windows that have between-the-glass shades or blinds. Choose windows with Low-E coatings to keep your furniture safe from the sun’s rays during the summer.
6. Maintenance
Window maintenance is highly crucial from the outside. Consider nearly maintenance-free aluminum cladding for the best in ease, which will keep your windows looking great for years to come.
Are the windows built to be easily cleaned from the inside of the house? Are the grilles shielded between glass panes to make cleaning easier? Is it simple to maintain and run hardware options?
Popular Window Frame Materials
1. Wood
Wooden frames are extremely adaptable and have a polished, elegant look. Because wood is a poor conductor of heat, it saves more energy than aluminum frames.
Suitable quality wood frames are a costly option, but they endure a long time and are a good choice for humid locations. They do, however, require regular care, such as painting or polishing.
2. Aluminium
Aluminum frames are light, sturdy, and long-lasting, but they do not provide adequate thermal insulation. They can be customized in a variety of sizes, shapes, and powder coat colors, but if the anodization goes off, they require a lot of maintenance.
3. uPVC
Unplasticized Polyvinyl Chloride, or uPVC, frames require little upkeep. These frames are heat-resistant, and the UV-resistant combination does not fade in the sun. They don’t decay, corrode, or rust, and they aren’t susceptible to termites, but they don’t endure as long as wood or aluminum frames.
4. Fibreglass
Fiberglass is the most environmentally friendly solution because it is extremely durable and weather-resistant. Fiberglass is mostly formed of sand; therefore, the amount of waste and hazardous fumes produced during production is significantly reduced.
The frame expands and contracts like glass, reducing air leakage and enhancing energy efficiency. It has none of the disadvantages of metal or wood.
5. Composite
These windows, which are produced from scrap wood shavings and plastic resins, have a wood-like appearance yet are nearly maintenance-free. And, because the polymers used in the window-making process are frequently made from recycled plastics, they’re a green option.
6. Vinyl
A well-built, professionally installed vinyl window can be a cost-effective option while still providing good energy efficiency benefits thanks to insulated glass and air-tight construction.
Various Window Styles
1. Casement Windows
Casement windows have a door-like opening. They have a side-hinged sash (frame pieces encircling glass panels) that can open inwards or, more commonly, outwards.
2. Sliding Windows
Sliding windows move horizontally along rails in either direction.
3. French Windows
French windows (or doors) can be used on outside walls to open up to balconies, terraces, and patios, as well as within a home to divide spaces. This style, which is usually made out of glass panels set within wood frames, gives the room a classic and elegant appeal.
4. Bay Windows
A Bay window is a group of three windows that are joined at 30-45 degrees and protrude outwards. Each glass has the option of opening outwards like casement windows or remaining fixed.
5. Top Hung Windows
These windows are hinged at the top of the frame and open outwards. Top-hung or awning windows are typically used in conjunction with other window styles or on top of doors (for bathrooms).
6. Louvered Window
Multiple slats of glass, wood, or vinyl are attached horizontally and parallel to a frame in this form. Cranks or handles are used to open them. They’re also known as Jalousie windows, and they’re useful in humid spaces like restrooms or in countries where the summers are very harsh.
7. Skylights
Skylights provide direct access to the roof and are built into the ceiling. Keep leak-proof designs and heat-resistant coatings in mind while selecting skylights.
8. Hopper Window
Hopper windows have hinges on the bottom of the sashes, which makes them ideal for small spaces. They can open by pushing outward or pulling inward.
9. Tilt and Turn Window
Tilt and turn windows are a hybrid of hopper and casement windows, opening from the top with hinges on the bottom (turn inwards with hinges at the side). The dual-hinge system allows for top and side openings.
10. Picture Window
This style, sometimes known as fixed windows, is ideal for allowing natural light into a space.
Home / Architectural / Difference Between Marble And Granite
Contents show
Marble Vs Granite
Marble vs Granite one of the toughest decisions for house owners, builders, buyers, engineers, and contractors. When it comes to buying a new house or renovating an existing one, the homeowners get confused while selecting one from the two natural stones marble and granite.
Due to a lack of knowledge and information regarding these stones create a lot of confusion during their selection. Which one should I use? And where should I use it? These basic questions come to mind when choosing between marble and granite.
Both marble and granite are equally popular among buyers and house owners, and both of them are attractive and beautiful, and they can bring a pleasing aesthetic element to the house.
What Is Marble?
Marble is a metamorphic rock, composed of recrystallized carbonate minerals such as calcite and dolomite. The word “marble” is derived from the Ancient Greek word “marmaron” which means “crystalline rock shining stone”.
It is a rock resulting from the metamorphism of sedimentary rocks like limestone or dolomite rock. This process causes variable recrystallization of the original carbonate mineral grains. Thus marble is formed.
There are many varieties of marble available around the world. Each one of them has different properties, color, and origin too.
For example, pantelis marble is pure white in color, and originated in Greece, and Makrana marble is white colored marble that originated from Rajasthan, India. Taj Mahal was constructed using Makrana marble.
Marbles are primarily used for buildings, sculptures, interior decoration, tabletops, etc. The most important qualities of marble are color and appearance. Due to these qualities, marble is extensively used and very popular among homeowners.
What Is Granite?
Granite is a medium or coarse grained igneous rocky hat that is rich in elements like quartz and feldspar. Other than that, it also consists minor amount of minerals like mica and amphiboles.
It is formed by the cooling of magma present at a certain depth of the earth’s surface. Feldspar is the principal constituent of granite.
Due to its composition, granite is obtained in colors like red, pink, grey, or white. The dark colored grains in granite are large enough to be visible to the naked eye.
Granite is one of the best igneous rocks. It is very popular due to its wide variety and uses. Granite is extensively used for making objects that are everyday used by people. These objects include countertops, floor tiles, paving stone, curbing, stair treads, building veneers, etc.
Granite is also used for the construction of famous monuments like:
Mount Rushmore in South Dakota
Brihadeshwar temple in India
Avukana buddha statue in Sri Lanka
Diana, princess of wales memorial fountain in London
Vietnam veterans memorial in Washington, DC
Difference Between Marble And Granite
Marble Vs Granite
Marble vs granite is a tough decision for homeowners when it comes to building or renovating a house or any such property. Both of them are often mistaken for one another.
Though marble and granite are aesthetically pleasing, both have their merits. That’s why it is important to learn the difference between marble vs granite. Marble and granite are different in many aspects. They are as given below:
Origin
Aesthetics
Durability
Cost
Let us learn each of the difference in detail below:
1. Origin
Both marble vs granite are natural stones. To acquire these stones, mining and excavation are necessary processes. Marble is a sedimentary rock. It is obtained when big rocks are naturally broken down into smaller pieces. This natural design of stone appears due to its exposure to extreme heat and pressure.
Granite is an igneous rock. The formation of granite includes cooling down and solidification of molten lava present under the surface of the earth. It goes through periodic heating and cooling, which is responsible for the properties of granite like durability and hardness.
2. Aesthetics
Both marble and granite are known for their appearance. It is one of the main reasons that they are used extensively for decorative construction and architecture.
A layman, at first would not be able to differentiate between marble vs granite as they look alike. However, their unique physical features differentiate them from each other.
For instance, the veins running down a slab of marble are relatively larger with fairly consistent colors, whereas the veins on a granite slab are smaller and appear as specks on the surface. Granite also differs in color and it contains a variety of hues.
3. Durability
When it comes to hardness and durability, both the stones are highly durable subject to if proper care of them is taken. Marble is more porous than granite. It is likely to get affected more by stains and spills. Marble is also weak against acidic liquids.
Granite is comparatively less porous than marble but still, it can be affected by stains and spills. Sometimes sealants are used to improve its ability to resist stains and spills.
4. Cost
Costing includes material cost, installation cost, and maintenance cost. The cost of marble is slightly more than the cost of granite. It also depends on factors like vendors, quality of the stone, the quantity bought, etc.
Before buying a particular stone, all the costs related to it shall be considered and it is advisable to consult professionals.
So that’s the difference between Marble Vs Granite. I hope you have now enough knowledge about it. Which material you will choose between Marble Vs Granite for your home? Let me know in the comments.
Home / Construction / Floating Slab – Construction, Advantages, & Disadvantages
What Is Floating Slab?
A floating slab is another type of concrete slab laid on the ground with no support. The slab is built in two stages. Footings are cast individually in the first stage, and then the center floor of the slab is poured.
Because of the floating slabs, the ground preparation is reduced to a larger extent. Since the floating slab does not have a connection with the foundation, it is also called a monolithic slab.
This type of slab is used when the structure requires low bearing capacity. This foundation is suitable for small structures where a deeper structure is not required and when additional infrastructure is not needed.
Floating slabs are used as the foundation for small structures such as manufacturing workshops, sheds, and garages. Let’s discuss its construction process.
Why Use Floating Slab?
Floating slab is one of the most economical foundation construction methods. Traditional foundations require a strip footing with a frost wall above. The strip footing installed below the frost level is usually 4 inches below grade. The cost of a strip footing and frost wall is higher because more excavation, concrete, and labor are required.
Construction Procedure Of Floating Slab
To begin the construction of floating slabs, the planned building requires a stable foundation to completely sustain the entire weight of the superstructure.
As previously said, they are more commonly utilized in garages, home additions, and sheds that do not require large foundations. Structure-wise, these structures are light.
When compared to conventional slab construction, floating slabs are proven to be the most suited and cost-effective. The steps involved in the construction of a floating slab are described below.
1. Site preparation
The first step is to inspect the site where the floating slab will be built. Clear the site of any trees, small shrubs, or other debris. Then, make an excavation plan, including where to dig and where to take the soil.
2. Excavation
After all the preparation, the next step is to excavate the site. Excavate the area for the slab in accordance with the level. In this step, make a drainage channel on the sides for water to drain out through the gravel base.
Source: cementwright.ca
Water will be removed from the concrete slab foundation by sealing the trench with geotextile and gravel. Make sure to cover this channel with waterproofing material.
3. Laying Gravel Base
In this step, gravel is spread over the area to allow unwanted water to drain.
4. Reinforcement For Slab
After laying the gravel base, the next step is to prepare reinforcement as per the structural design. Lapping should not occur in a single location during reinforcement; instead, it should occur in a different manner.
Source: waddelleng.com
In addition, the reinforcement must be in accordance with the slab’s dimensions and specifications in order to strengthen the structure.
5. Shuttering
Now, it is time to begin shuttering. The formwork may require a smooth surface, proper alignment, and good quality work. To prevent the formwork from opening during concrete pouring, the cover block should be fixed after shuttering.
6. Concreting
Concrete can be made on-site in a concrete mixer, or ready-mixed concrete can be used for floating slab concreting. All materials are mixed in a proper mixer machine to achieve high strength.
Adequate compaction should be performed during the concreting process. Depending on the area and workmanship, it is compacted by hand or by a mechanical vibrator. After 24 hours, the shuttering should be removed.
Source: waddelleng.com
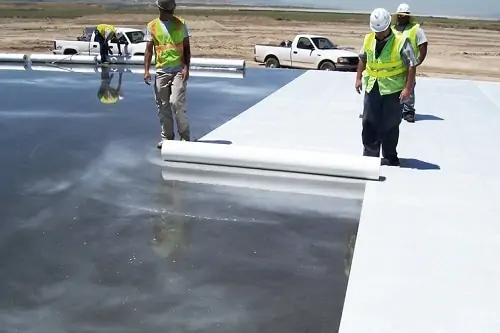
7. Curing
The slab should be cured for seven days after removing the shuttering. Curing plays an important role in achieving the desired concrete strength. For curing, water is sprayed.
Advantages Of Floating Slab
• A floating slab can keep moisture out of the floor. It is used to separate the ground and the superstructure. Additionally, it protects against water and frost.
• This slab has the spreading property, which allows vertical loads or stresses to be distributed over a larger area.
• A floating slab is a good option if your home requires an extension. This slab serves as a physical barrier between the superstructure and the ground. This prevents water and frosting. As a result, this slab is mostly used in cold-weather construction.
• Don’t require a wood flooring system & 8′-0″ basement wall.
• It requires less concrete and formwork for more economical and ecological construction.
• No footer trenches are required for this slab. They can be poured by trenching or excavating, which is a less expensive method. This slab causes no disturbance to the earth beneath it.
• Floating slabs can be heated with radiant floor heat, which provides a comfortable and balanced heat.
• Floating slabs are the best choice where the soil layer has a chance of shifting, primarily because of high moisture content.
• Cheaper house insurance because there is no basement to flood or chance of Radon gas infiltration.
Disadvantages Of Floating Slab
• It uses outdated technology.
• Less design resonance exists in foundations with floating slabs.
• Loss of storage space.
• Because there is no space in the floating slab for a sewage line, a trench must be dug during the construction.
• Floating slabs are ineffective for overloaded bearing structures.
• Repairing a floating slab is costly.
• Sometimes, the resale value of the house is lower because of the missing basement.
Uses
Floating slabs are mostly used for the following buildings
Accessory buildings
Garages
Drive sheds
Houses & cottages
Barns.
So that’s all about the floating slab. I hope you now have enough knowledge about it. Please share any questions you may have in the comments section.
The first thing one notices when entering the house is the flooring. When choosing flooring for your house, there are various factors to be considered, such as cost, durability, appearance, installation, and maintenance. Learn about different types of flooring from this article.
Flooring is a covering over the floor with a finish material to offer a walking structure. There are various types of flooring materials available to choose from.
Each type of flooring material has its advantages and disadvantages. Let’s have a glance at the different types of flooring materials available in the market.
Flooring Options To Choose From
1. Tile Flooring
Tile flooring is one of the most durable, stylish, and contemporary types of flooring for homes. Tile flooring is a great choice for damp areas such as bathrooms, kitchens, and mudrooms since sealed tile is water-resistant.
Source: sentosa.in
However, due to its versatility, you can use it in any room. The patterns, finishes, and colors available for tile flooring are endless.
Tile flooring is not only attractive and elegant but also long-lasting and easy to maintain. It is super easy to clean and replace. Grout between tiles requires regular maintenance, especially in high-traffic areas. Common types of tile flooring are:
Ceramic tile flooring
Porcelain tile flooring
Vitrified tile flooring
2. Marble Flooring
Marble is a metamorphic rock that is commonly used for flooring in commercial buildings as well as residential buildings. It imparts a luxurious look to your house. Italian marble flooring is considered for luxurious high-cost buildings.
Marble Flooring
Marble comes in various colors, including white, pink, and grey. It is relatively easy to maintain and sometimes last more than 25 years.
Marble flooring is more expensive than other types of flooring due to its natural occurrence and limited availability. Installation of marble flooring is difficult and requires expertise.
3. Wood Flooring
Wood flooring is an age-old traditional flooring material; nonetheless, it provides a timeless appeal to the home. Wood flooring is one of the most popular types of flooring in Western countries.
pexels.com
It is also preferred where wood is inexpensive, like in hilly locations. Wood flooring comes in strips, thin slabs, and planks made from a variety of softwoods and hardwoods. It lasts for more than 50 years if maintained regularly.
Wooden flooring is ideal for dance floors, auditoriums, and other similar applications. Wood floors are not recommended for wet areas such as bathrooms and kitchens.
4. Vinyl Flooring
Vinyl flooring is another name for PVC flooring. Vinyl flooring is one of the most lasting forms of flooring since it provides elegant, cost-effective, water-resistant, and stain-resistant alternatives. Vinyl is available in a variety of styles that mimic hardwood and stone finishes.
Vinyl flooring is an excellent solution for places prone to spills and moisture, such as bathrooms, kitchens, laundry rooms, and office spaces. They come in sheet, plank, and tile form. They are the lightest flooring material available today.
Source: doors2floors.co.uk
Vinyl flooring is, however, prone to scratches and stains. Vinyl flooring can last up to 10 to 15 years with proper maintenance. It cannot be refinished like wood flooring, so the only option is to replace it entirely if it begins to wear out.
5. Concrete Flooring
The most frequent flooring material is concrete. It is ideal for any form of structure, as it is more durable and less expensive than others. It is a mixture of cement, pebbles, granite chips, and other components, making it sturdy and long-lasting.
Concrete flooring has two courses – base course and wearing coat. Concrete flooring is resistant to damage except for minor chipping and scratching caused by wear and tear.
null
It is very easy to maintain and clean concrete floors. Concrete flooring is less expensive as compared to other types of flooring materials.
6. Rubber Flooring
Rubber flooring is made of natural or synthetic materials, such as recycled rubber tires. It is classified as resilient flooring because of its elasticity or “bounce.” This makes it ideal for dance floors, restaurants, and other high-traffic situations where foot tiredness and slippage are possible.
Source: thespruce.com
It is also used in playrooms for children, showers and bathrooms, garages, home gyms, and other applications that require moisture and stain resistance, as well as sound absorption, durability, flexibility, and temperature stability.
7. Carpet Flooring
Carpet has an upper layer of a pile that is attached to a backing. The pile is typically made of wool or heat-treated fibers such as nylon, polyester, or polypropylene twisted into tufts or woven. Carpet flooring comes in a variety of textures, styles, and colors.
null
It is a child-friendly flooring option frequently used in children’s bedrooms and nurseries worldwide. It can also be used in the living room and bedroom. The carpet is also an insulator, both in terms of heat and sound.
Source: nonns.com
It’s popular in colder climates. Cleaning and preserving the carpet flooring requires additional time and money. If not cleaned regularly, it may become dirty and emit a bad odor, making it unsuitable in hot, humid, or dusty environments.
8. Granite Flooring
Granite can be an exquisite option when it comes to picking the best flooring options for your home. Granite is an igneous rock used as a dimension stone in home and commercial construction.
Granite flooring is perfect for use in the kitchen and adjacent spaces. This type of flooring is relatively easy to maintain because of its excellent stain resistance and longevity.
null
Granite flooring is prone to scratches, and hence one needs to preserve it from scratches. The stone remains cold most of the year, making it one of the greatest flooring options for homes in the hottest regions.
9. Laminate Flooring
Laminate can be a fantastic option if you’re seeking inexpensive flooring solutions that look like wood. Laminate flooring is becoming increasingly popular due to its durability, strength, ease of installation, and resistance to stains and water damage.
The variety of designs and finishes available makes this one of the best flooring materials for your home. When considering laminate flooring, look for slip-resistant solutions to keep your house safe from accidents.
Source: lamiwood.in
It’s also one of the least expensive and frequently available as a DIY-friendly “floating” floor system, with planks that snap together rather than being fastened or glued down. The Laminate cannot be resurfaced; thus, it is not a permanent floor.
Furthermore, the usage of formaldehyde and other chemicals during the manufacturing process makes it a less healthy and environmentally friendly option.
10. Cork Flooring
Cork flooring is a great choice for modern design. Cork flooring is resilient and quiet underfoot, adds impressive visual warmth to a space, and can be used in most dry areas. It works well in lofts or kid’s rooms.
This type of flooring has the same warm appearance as wood but with unique grain patterns that can include speckles and swirls. It is available in tile or plank form and is made the same way as laminate flooring, with a top layer attached to a strong core material underneath.
Source: thefloorshop.com
Cork is a natural, renewable material and has a low environmental impact. You can use rugs on top and vacuum like carpet or swiffer like wood and vinyl floors. But unfortunately, like carpet, heavy items will leave an impression on the cork floor.
11. Bamboo Flooring
Bamboo flooring is ideal for moderately dry climates and can replicate the appearance of wood floors. While the bamboo plant is grass rather than a tree, bamboo flooring looks similar to wood flooring. Bamboo is as durable as most types of wood flooring.
It is an easy-to-maintain flooring option because it is water and stain-resistant. It is an eco-friendly flooring material, as it is available in abundance and can grow rapidly compared to trees which give wood for flooring.
Bamboo flooring can be refinished if damaged, just like a wood floor. Scratches, however, can be an issue with bamboo flooring. Similarly, humid conditions can cause bamboo boards to swell; therefore, this flooring style is best suited for use in mostly dry areas.
12. Linoleum Flooring
Linoleum is an eco-friendly product made by oxidizing linseed oil with gum, resins, pigments, cork dust, and other materials. It comes in sheets and is typically used as a covering for concrete or wood flooring.
null
The sheets can be simple or printed with a design. It is popular since it is a low-cost and highly versatile (in terms of design) flooring option.
It is typically used in kitchens, bathrooms, or areas like a home gym. Along with the distinctiveness and retro charm of linoleum, its sustainability is a prominent selling feature.
Linoleum is very soft underfoot, making it highly comfortable.
Linoleum is not as long-lasting as vinyl. It is prone to wear under strong foot traffic and is easily scratched and dented. A wax finish will help protect the surface, but it will increase maintenance.
13. Epoxy Flooring
Epoxy resin is a thermosetting chemical commonly used to manufacture Epoxy flooring as a protective and ornamental coating on concrete floors.
This flooring is often used in commercial and industrial buildings such as food and beverage industries, chemical test labs, R&D laboratories, and warehouses. It is also used in hospitals, showrooms, athletic facilities, and garages.
Source: epoxyflooringcolumbiasc.com
Epoxy flooring is available in several colors and has a long lifespan since it is highly resistant to abrasive substances. The flooring is easy to clean because of its firm and smooth coating.
14. Terrazzo Flooring
Terrazzo is a solid contender among the various flooring types to consider. It is made of granite and marble chips inserted in concrete to create a speckled appearance.
Terrazzo flooring is used in restrooms, dining areas, businesses, and hospitals. Before the introduction of vitrified tiles, it was the most popular material. These tiles are visually appealing due to their lack of joints.
This appears even more attractive now that mirror polishing is commonly available at reasonable prices. However, very skilled labor is required for installation.
15. Brick Flooring
Brick flooring is commonly used in various places due to its low cost. Bricks are well-known for their exceptional strength, fire resistance, and long-term durability.
They are also simple to clean. Brick flooring can be used in various designs, including staggered, basket weave, and other combinations.
This is one of the best flooring options if you want to keep your home at a comfortable temperature while also adding a rustic touch. However, brick is incredibly porous and can quickly chip off if not properly maintained.
Points To Remember While Choosing Type Of Flooring
Due to their different advantages in different conditions, it becomes tough to select the type of floor, and as such, the following points should be kept in view while choosing the type of floor.
The floor should be strong and durable.
It should be easy to clean.
It should possess a pleasing appearance.
It should be free from dampness.
It should be noiseless as far as possible.
It should be fire-resistant.
It should have low or no maintenance cost.
It should not be costly.
Conclusion
These are the most popular flooring materials available in the market. Before choosing an appropriate flooring option for your home, remember that you and your family will use it. Choose flooring that fits your lifestyle, ease of maintenance, and budget.
Architectural / Types Of Building Plans Used In Construction
Building plan is the most important thing we need to start any building construction project. It gives a clear idea of how the building will look after the completion of construction. Building plans are also useful in estimating building materials, project costs, and budgets. In this article, we will discuss different types of building plans used in construction.
A building plan is simply a graphical representation of a building and its different elements. It contains different types of plans of a building such as site plan, floor plan, structural plan, cross-sections, elevations, electrical detailing, plumbing, and landscape drawings.
The construction is done followed by such plans and drawings. Building plan is sometimes also referred as building drawing, architectural plan, or architectural drawing.
Types Of Building Plans
The different types of building plans are as follows:
Site Plan
Floor Plan
Structural Plan
Terrace Plan
Cross-section
Elevation
Landscape plan
1. Site Plan
Site plan is the first design made for any project that represents the whole plan of the construction site. Site plans contain details of property boundaries, access to the site, and existing structures on or near the construction project, such as roads and buildings.
The site plan also shows all the service connections such as water supply, drainage, and sewer lines, electrical lines, communication cables, etc. Site plan must comply with the existing bye-laws and local development codes.
2. Floor Plan
2. Floor Plan
Floor plan is one of the most interesting types of building plans. It is the top view of a floor layout. Floor plans are a form of vertical orthographic projection which is represented by a plan cut at sill level of windows on that floor.
Buildings with multiple levels generally have different floor plans for each level. Floor plans include specifications such as
Dimensions of rooms (room sizes),
Dimensions of interior and exterior walls,
Dimensions of doors, windows,
Positions of furniture,
Stairs and their direction.
Floor plans are typically two types
2d floor plan
3d floor plans
2D floor plan is a flat representation of the floor layout that shows measurements of rooms, walls doors, windows, stairs, etc.
3D floor plan shows the actual look of the entire building with furniture from above. It gives you a chance to see your fully furnished and decorated building before its completion.
3. Structural Plan
This type of plan provides a complete view of structural aspect of the building. The structural plan contains location, nomenclature, size and placement of reinforcement, details of structural elements, and load-carrying members of the building. Structural plan is very important because it focuses on the strength of the structure.
4. Terrace Plan
The terrace plan is the plan at the roof level of the building. It shows stair cabin, lift cabin (if any) overhead water tanks, etc along with roof drainage pattern. The terrace plan also shows the parapet walls.
5. Cross-section
Section plan is a vertical cut section through the building showing the details of dimension, thickness of any component of a building. In simple, it shows the view of a structure in sliced form. Section plan includes
Floor height,
Sill height,
Lintel height,
Beams
Columns etc.
The section plan is represented in the 2d floor plan by a bold dotted straight line.
6. Elevation
Elevation plan drawing is an orthographic projection that shows one side face of the building. It is a 2d drawing of the building’s facade. The main purpose of elevation drawing is to show the finished look of a particular side of the building.
Elevation plans are two types:
External Elevation
Internal Elevation
i) External Elevation
The external elevation shows the exterior of the building. It provides the details of type of finish, floor height, and projections. Exterior elevation can be represented in 2D or 3D drawings.
2d drawings typically provide measurements whereas 3D renderings show an exact look of your building when completed.
ii) Internal Elevation
Internal elevations provide a pre-visualization of the building’s interior. It shows the interior of different rooms along with the details of paint color, furniture designs, lighting types, and floor patterns. Internal elevations are mostly represented in 3D form.
7. Landscape Drawings
A perfect home or building is always incomplete without proper landscaping. If you want a small garden in your backyard, or want to add foliage and walkways in your complex. Then you should consider hiring a landscape planner. A landscape professional will surely help you beautification your outdoor.
Landscape plan provides all the details of flowers, plants, sidewalks, lawn decorations, fountains swimming pools (if any), etc. A proper landscape design can enhance the living area and increase your property value. This is why landscape plan has become one of the top trending types of building plans in today’s world.
Home / civil engineering / How To Draw A House Plan (Step By Step)
Contents
What Is A House Plan?
When buying or renting a house, your agent might have shown you a 2D drawing of that house. It is a top view of the house that shows the entrance, living room, bedroom, kitchen, etc. Moreover, it shows the North direction, sizes of the rooms, doors and window locations, etc. Little you know, it is a house plan.
Further, a house plan is a tool to visualize the house. It helps in how the house will seem after construction or modifications. Also, you can assess the space usage of the house, how you enter the house and move through the rooms.
Moreover, when designing or selling a new home, buyers and sellers use floor plans as a planning tool. A house plan is a scaled diagram of a room, floor, or entire building with all the measurements. Therefore, a house plan forms a basis for the electrical wiring, plumbing, drainage, and furniture layout.
As per the market research of Rightmove, a floor plan is more important than the images of the house. Also, 20% of the online buyers don’t consider the properties without a floor plan.
Importance Of A House Plan
A house plan has multiple uses, from planning to construction to buying/selling. A good house plan assists in the following-
1. Provides Flexibility In Design
A house plan is often modified for cost optimization, utility issues, or improving productivity. The suggested changes are before the construction. Hence, saving the rework and money wastage.
2. Basis Of Design
A house plan is the blueprint of the house. It is the basis for detailed designing of the house, sections, elevations, etc. The measurements, direction, spatial arrangement, and amenities are tentatively marked.
3. Resource Planning
A house plan may help in resource planning. The number of units calculated for the work is plotted in the house plan. The resources’ motion study across the house determines the hindrances and obstructions to the resource productivity.
4. Material Planning
The construction material tentative requirement for the house may be estimated based on thumb rules and rough calculations.
5. Builds Confidence In Buyer
When buying or renting a house, a house plan shows a clear picture of the house without the visit. Images can be deceptive, but a house plan doesn’t lie.
Sample House Plan
Steps to Draw a House Plan
The below listed 7 step process enables you to make a house plan in no time. You can make a plan on paper or software.
1. Define The Requirements
This is the crucial step when it comes to making a house plan. Bring all the stakeholders to a table and discuss their expectations from the house. Decide the required features and amenities with the stakeholders.
The features may include the following-
No. of Floors: The number of floors required for a house determines the plan’s requirement. A building made for apartments has more floors than the nuclear family use building.
Bedrooms: The required number of bedrooms should be known before drawing a house plan. A master bedroom is the largest bedroom in the house and is limited to 1 on each floor.
Living room: A living room is a place for general activities, entertaining guests, gatherings, etc. A living room is generally connected to the main entrance and has a toilet nearby.
Kitchen: A kitchen is limited to 1 on each floor. It has the facility to wash and store the utensils. Provision for storing food items and a refrigerator is also there.
Dining Hall: A dining hall connects to the kitchen. It hosts a dining table and chairs.
Bathroom: The bathroom can be isolated and also attached to the bedroom. A master bathroom is the largest sized bathroom in the house.
Toilets: Nowadays toilet is often attached to the bathroom to save space and cost.
Store Room: A storeroom for storing lesser-used goods may be provided where the space is available.
Pooja Room: A pooja room is often a small room provided with an altar.
Garage: The garage houses the cars.
Open Space: The open to sky spaces are a requirement at some houses.
Basement: A basement is often made as a hall with little built up. It can also be used as a garage.
Balcony: The balcony provides extra space beyond the built-up area.
2. Know Your Plot
Now you have collected the requirements of the house, and you know the number of floors, bedrooms, bathrooms, toilets, kitchens, etc.
It is time to check the plot of the house. Here is what you should check in the plot-
Direction: All the house plans refer to the North direction. You can use a compass for direction determination.
Location: Look for the road. Plan the entrance towards the road-facing side of the plot. For plots on corners, there is an option to provide house entrance in any of the two perpendicular directions. Similarly, a plot having roads on two opposite sides also have an option for two house entrances.
Open Sides: The plot may be surrounded by buildings on the sides. Therefore, you should be careful when deciding the location of windows, ventilators, balconies, and open spaces in your house.
Plot Shape: The plot shape is essential for the design. A rectangular and square-shaped plot is more desirable as it has a lower cost of construction. Moreover, they are Vastu compliant as well.
Area and measurements: Measure the plot sides and calculate the plot area. You can take the expert help for this, or you can measure the same with tape.
3. Decide The Scale
The fieldwork has been completed with the previous step. It is the time to bring the imagination to the paper.
The scale of a drawing is the ratio of drawing measurements to the actual measurements. It helps you in proportioning the space accurately.
For example, if you choose a scale of 1:100, you will draw a line of 1 cm on paper for the actual line length of 100 cm.
In another example, if your plot size is 40′ x 25′ and the scale is 1:100. The house plan dimension shall be 4.8″ x 3″. A scale between 1:20 to 1:100 is suitable for most of the house plans.
4. Mark The Plot Boundary
Use the following steps to create a plot outline.
Convert the field measurements of the plot into the drawing measurements using scale.
Draw the plot boundary on the paper. Make sure the angle between the boundary lines is the same as per the actual.
Mark the North direction.
Mark the road and nearby landmarks (if any).
5. Draw Partitions
Now you need to draw the partitions.
Mark the plots with boundary.
This step creates the internal structure of the house.
Tentatively mark the single line partitions of bedrooms, living room, kitchen, dining room, bathrooms, open space etc.
Check if the plan includes all of the required features.
Detail the wall thickness and measure the room sizes. Re-adjust the sizes if any space seems out of proportion.
Look out for the balconies beyond the ground floor. The balconies should not extend beyond the plot boundary.
6. Include Amenities
Draw the house features like a washbasin, kitchen sink, bathroom utilities, etc.
Place the furniture.
Mark the facilities with notations.
Draw the doors, windows, and ventilators.
Standard Room Sizes
Decide the room sizes, with the standard sizes mentioned below.
1. Master Bedroom
1. Master Bedroom
Size Dimension (ft) Large 16 x 24 Medium 14 x 20 Small 12 x 14
2. Standard Bedroom
Size Dimension (ft) Large 14 x 16 Medium 12 x 12 Small 10 x 10
3. Living Room
Size Dimension (ft) Large 22 x 28 Medium 16 x 20 Small 12 x 18
4. Master Bathroom
Size Dimension (ft) Large 10 x 16 Medium 8 x 12 Small 6 x 9
5. Standard Bathroom
Size Dimension (ft) Large 8 x 12 Medium 7 x 10 Small 6 x 9
6. Standard Kitchen
Size Dimension (ft) Large 12 x 20 Medium 10 x 16 Small 5 x 10
All engineering drawings include a particular way of representation. The representation can be done by using specific symbols representing the element to be built in that particular place or area. These symbols provide a visual model of the structure to be constructed.
Like other engineering drawings, Architecture drawings also include some symbols that help give an easy presentation of the project to non-technical persons or clients.
Architectural symbol
These architectural symbols are necessary and must be included in the architectural drawing as they are easy to understand. So in this article, we have rounded up various architectural symbols used in construction.
Different Architectural Symbols
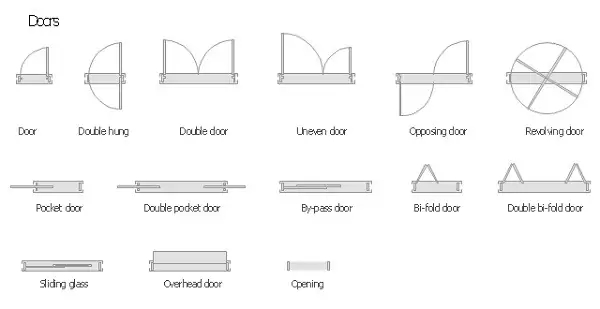
1. Door Symbols In Architecture Drawing
We know that 99% of the structures built require doors at their entry/exit point, and doors are the main elements of the structure that play a vital role in individual privacy and security.
So, it is essential to specify the position of the door in the drawing using door symbols. Door symbols help the workers, contractors, or clients understand where doors will be located in the building.
The below-given door symbols are commonly used in architectural drawings to represent the door position in the structure.
Door symbol
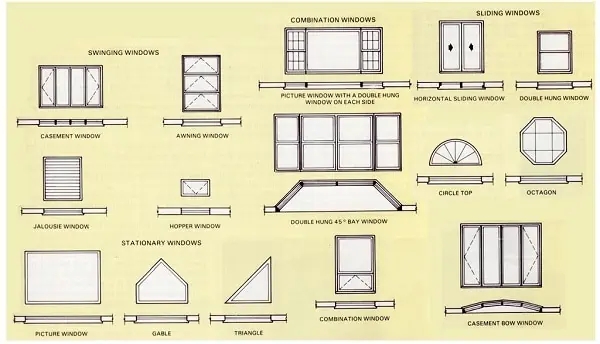
2. Window Symbols In Architecture Drawing
Like doors, windows are the second most crucial element in the building, which play an essential role in the ventilation and security of the house or building.
Using window symbols in architectural drawings gives an idea of where they will be positioned and what type of windows will be installed.
Window symbol Window symbol
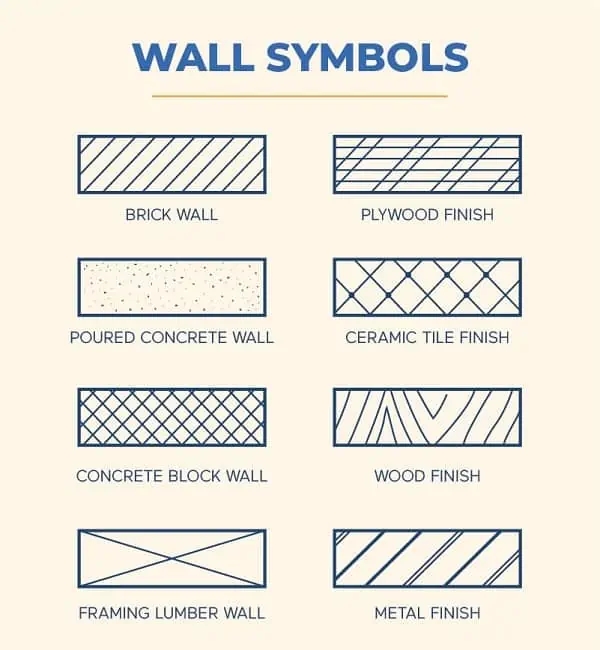
3. Wall Symbols In Architecture Drawing
It is necessary to assign door symbols in architectural drawings because the project involves the construction of different types of walls with different designs, such as the main wall, parapet wall, compound wall, and other decorative walls.
So, each wall must be represented with a particular symbol showing the type of material and design used during construction.
Below are some wall symbols that represent what type of material to use to construct the wall; materials are represented using patterns such as brick, sand, concrete, gravel, rock, swamp, and fence. Refer to the below image.
Wall symbol
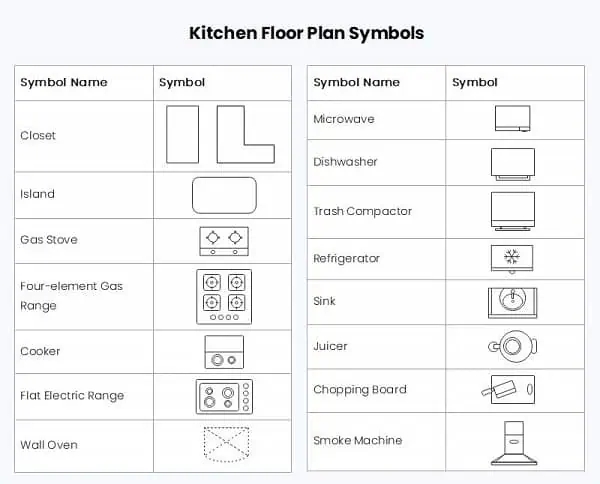
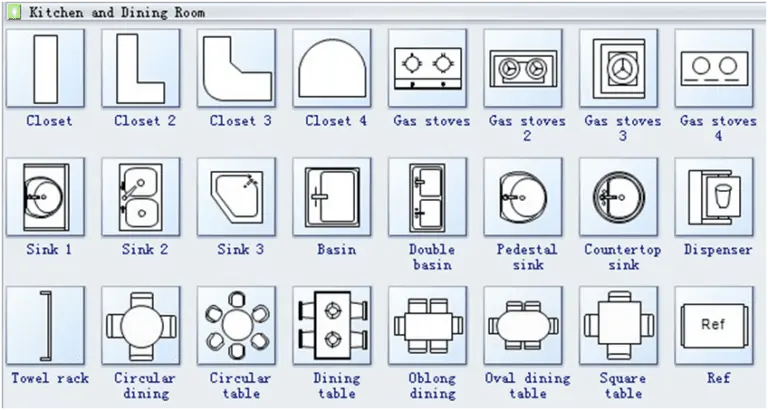
4. Kitchen Elements Symbols In Architecture Drawing
The kitchen includes several elements, from a cabinet to a washbasin which must be mentioned in the architecture drawing using Kitchen Elements symbolsto avoid future problems.
These architectural symbols help in visual representation and help decide the space or the area for a particular element.
These kitchen element symbols include cabinets, electric range, washbasin, refrigerator, gas range, sink, etc.
Kitchen floor symbol
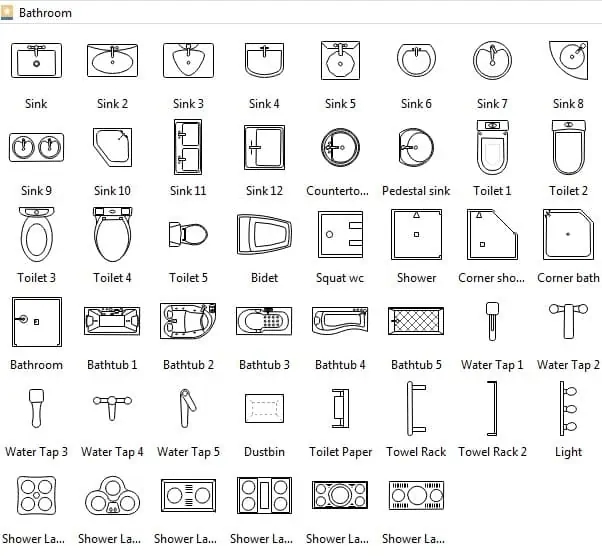
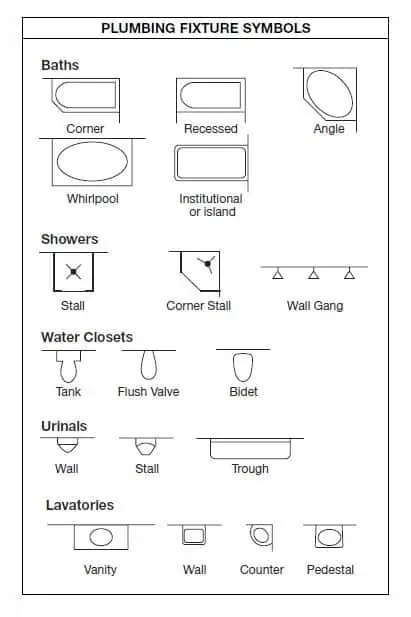
5. Sanitary Fitting & Plumbing Symbols In Architecture Drawing
Sanitary fittings are an essential element of a structure as they help keep the area hygienic. Sanitary fitting includes Hand washbasins. Sinks (glazed or stainless-steel sinks), Bathtubs., Water closets, Urinals, and Flushing cisterns.
These sanitary fitting positions must be mentioned in the architecture drawing using Sanitary fittings symbols. Using these architectural symbols will make it easier to understand the drawing and execute it properly without any confusion.
Bathroom symbol Plumbing fixture symbol
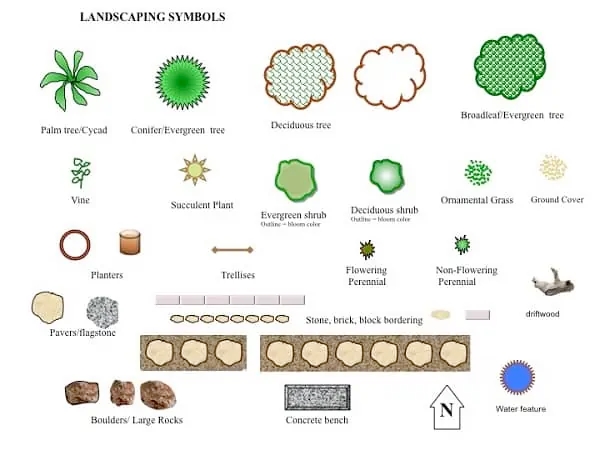
6. Landscape Symbols In Architecture Drawing
Landscape symbols are architectural symbols that help to represent the landscape view of the buildings; landscape includes the representation of the building surroundings such as lawns, gardens, trees, patios, etc.
Below are some of the landscape symbols commonly used in architecture drawing to represent the building landscape.
Landscaping symbols
Building Material Symbols In Architecture Drawing
Building materials symbols represent the type of material used for the construction or installation of particular structure elements.
Building materials such as brick, steel, bronze, plastic, aluminum, cement, concrete, sand, wood, etc., are usually represented using specific patterns, as shown in the below image.
Using these building materials symbols gives clear instructions to the contractor on what type of material or pattern to be used during the construction.
Building Material Symbols
8. Service Symbols In Architecture Drawing
Service symbols are used to represent building services like rainwater outlets, passive vents, boiler flue, soil vent pipes, water inlets, outlets, etc.
Using service symbols in architecture Drawing gives clear instructions on where and what service elements to install.
9. Lighting Symbols In Architecture Drawing
These symbols are used to represent the type of lighting to be installed. There are many lights based on their placement area, such as indoor lights, outdoor lights, decorative lights, etc.
Specifying a particular Lighting symbol will be easier to understand the drawing and execute it properly without any confusion.
Lightning symbols
10. Furniture Symbols In Architecture Drawing
Furniture symbols are used in architecture drawing to represent the design layout of furniture placements in the living room, dining hall, bedroom, kitchen, etc. Furniture symbols include sofa, chair, table, bar counter, couch, stool, etc.